NOTE: This is Part 4 in a series on booting Ubuntu from an iSCSI disk. View all of the sections here.
In my previous posts I’ve walked through how to install and configure an Ubuntu installation on an iSCSI disk. We now need to setup our bootloaders to connect to and boot from the iSCSI disk. The bootloader of choice is iPXE (formerly gPXE). If you’re not familiar with iPXE:
iPXE is the leading open source network boot firmware. It provides a full PXE implementation enhanced with additional features – ipxe.org
Essentially, just like PXE, it allows you to get the files needed to boot from another computer on your network. However, iPXE provides additional protocols that normal PXE booting doesn’t. There are a number of different ways to setup your computer to start iPXE.

- The most straightforward method is to flash your network card with an iPXE ROM. This way your BIOS/EFI can run iPXE directly via the ethernet card. (see http://ipxe.org/howto/romburning for more information)
- The easiest method is to copy iPXE to local storage such as a CD, USB or even floppy drive.
- Since I wasn’t interested in flashing my card and didn’t have a spare USB disk to donate to the cause, I chose to PXE boot into iPXE. This is a bit more convoluted than the other options, but it allows me to run completely diskless on my client machine.
PXE/iPXE Overview & Differences
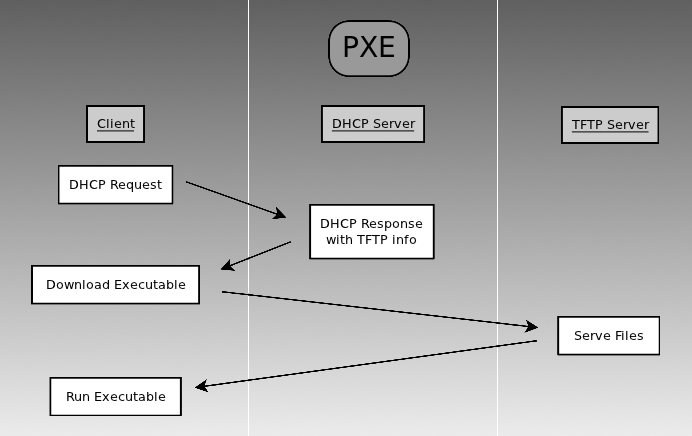
Here’s an overview of how standard PXE booting works.
- When you PXE boot a computer, the network card makes a DHCP request to the network.
- The DHCP server gets configured to respond to DHCP requests with not only an address, but also the TFTP server name, and the file name of the PXE executable.
- When the client receives this information, it connects to the specified TFTP server to download and run the PXE executable.
- The PXE executable connects to the TFTP server again and looks for the default menu configuration file on the server.
- Finally, the menu allows you to select a number of boot options a la GRUB, LILO, etc.
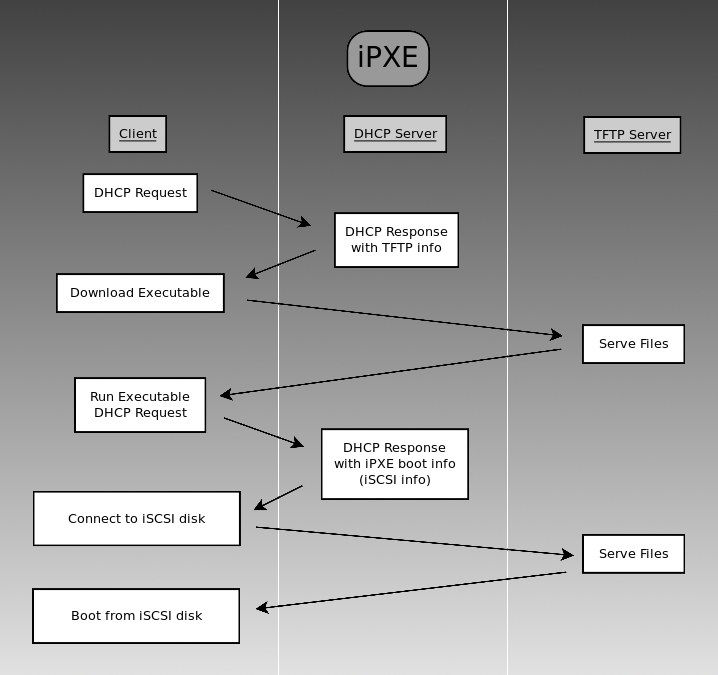
- (Same as above) The network card makes a DHCP request to the network.
- (Same as above) The DHCP server responds with an address, TFTP server name, the filename of the iPXE executable.
- (Same as above) The client connects to the specified TFTP server to download and run the iPXE executable.
- The iPXE executable initiates a new DHCP request and specifies the iPXE option in the request.
- The DHCP server recognizes that the iPXE option has been specified and provides the iSCSI disk to boot.
- The iPXE executable connects to the specified iSCSI disk and boot from it.
iPXE Setup
The setup of iPXE is very similar to the setup of PXE. If you have never setup a PXE server before, int0x80 has a great guide that walks you through setting up a typical PXE server. We however, require a very minimal setup compared to what he walks you through.
To begin, you’ll need to log into your Ubuntu server and install the tftp daemon.
root@server:~$ sudo su
root@server:~$ apt-get install tftpd-hpa
Next, make the directory that the TFTP server will be sharing. It’s typical to store the files at /tftpboot, however I prefer to store the files on my big media disk.
root@server:~$ mkdir /mnt/media/tftpboot
We need to specify that we want to use this directory in the configuration file. The configuration file is located at /etc/default/tftpd-hpa
As you can see from my comments in the configuration file, I had an issue with the TFTP_DIRECTORY setting not working correctly. Regardless of what I tried, the tftp daemon always served up the /var/lib/tftpboot folder. So I simply replaced that folder with a symlink to the folder I wanted to share. Hopefully your system will behave itself better than mine.
Let’s restart the service so that the changes take affect.
root@server:~$ service tftpd-hpa restart
Now we are sharing an empty directory via the TFTP protocol. Let’s get something useful in there. We need the iPXE binary. Head on over to http://ipxe.org/download to grab pre-built binaries or the iPXE source for your compiling pleasure. There are a number of different versions that can be built/generated, however I found that the undionly version was the only one that worked for me. Your mileage may vary. Once you have the binary, copy it to the tftpboot folder.
root@server:~$ cp undionly.kpxe /mnt/media/tftpboot/
That’s it! The server configuration is complete. In the next post we’ll cover the configuration changes for the DHCP server that will tie everything together.


To boot from iPXE looks a lot more complex, then booting from regular PXE.
What are the benefits of iPXE over PXE?
You might take a look at http://ipxe.org. The answer to your question is the first thing on that page.